Deployment
|
This content was generated with the assistance of AI and should be verified against the official documentation before being relied on in production. The reference material consulted while preparing these pages is listed in the section bibliography. |
This page is written against NestJS 12.1 (npm 12.1.2), TypeScript 6 (6.0.3), Express 5 and Fastify 5, and was checked on 2026-10-02. A NestJS 12 application needs Node.js 20.19+ or 22.12+ to run; the examples and the images use Node.js 24, which is the active LTS line on that date (24.21.0). The other versions used are @nestjs/terminus 12.1, @codegenie/serverless-express 5.0, @nestjs/mau 0.2.8 (pre-1.0) and PM2 7.0.4. Deploying the Bookshelf API means making it run on a machine that stays up, behind HTTPS, restarted when it crashes, replicated for capacity, and stopped without dropping requests. None of that is Nest-specific code. It is a set of decisions about what runs around the application, and Nest contributes only a handful of switches: NODE_ENV, enableShutdownHooks(), the Terminus health endpoints, trust proxy and the way the entry file starts the app.
The page first summarises the official Deployment page, then walks the targets in the order most teams meet them: a Dockerfile, Docker Compose, PM2 and NGINX on a plain server, Kubernetes, serverless, Mau and the cloud container services. It ends with backups and a checklist.
The official Deployment page at a glance
The official page is short and platform-neutral. It lists the prerequisites (a working application, a host, environment variables, backing services and a supported Node.js), then eight topics. This table says what each one means for Nest and where it is covered.
| Official topic | What it says | Covered |
|---|---|---|
Building |
|
|
|
Technically no difference for Node.js or Nest, but libraries in the ecosystem change behaviour (debug output, caches). |
|
Running |
|
|
Health checks |
Use |
Liveness and readiness endpoints, Health Checks & Observability |
Logging |
Use the built-in logger or a library; log errors, never secrets, add correlation ids, set levels, prefer JSON on AWS. |
|
Scaling up or out |
Vertical (a bigger machine) or horizontal (more instances behind a load balancer). |
Scaling out: what must not live in the process, The target architecture |
Other tips |
Security headers and CORS, monitoring, no hard-coded secrets, backups, CI/CD, rate limiting. |
|
Dockerizing |
A Dockerfile and |
|
Easy deployment with Mau |
|
Source: NestJS documentation: Deployment.
The target architecture
Everything below is a way of building the picture in the figure. One component terminates TLS and is the only one reachable from the internet. Behind it run N identical containers, each with one Node.js process: the application is stateless, so capacity is added by adding containers, not by adding threads. State lives in the backing services: PostgreSQL for data, Redis for the shared cache, rate-limit counters and queues, RabbitMQ for events between services. Configuration and secrets arrive at run time and are not part of the image.
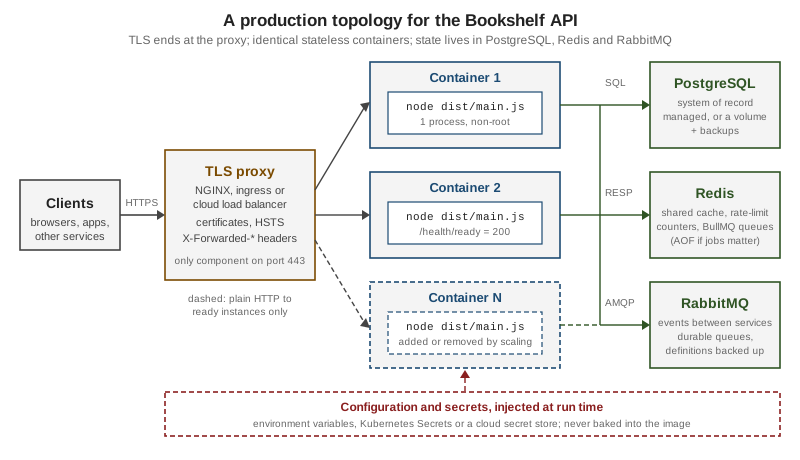
The same shape appears on every platform: in Compose the proxy is an NGINX service, in Kubernetes it is an ingress controller and a Service, on AWS it is an Application Load Balancer, on Cloud Run it is the platform’s front end. The application code that makes it work is the same everywhere, and it is small enough to show once.
Preparing the application
The entry file
The entry file decides four things that matter in production: the port, the listen address, whether the application trusts the proxy in front of it, and whether it reacts to termination signals.
import { NestFactory } from '@nestjs/core';
import type { NestExpressApplication } from '@nestjs/platform-express';
import { AppModule } from './app.module.js';

async function bootstrap() {
  const app = await NestFactory.create<NestExpressApplication>(AppModule);

  // Behind NGINX (or any load balancer): trust exactly one proxy hop so that
  // req.ip, req.protocol and secure cookies use X-Forwarded-For / -Proto.
  app.set('trust proxy', 1);

  // SIGTERM/SIGINT run onModuleDestroy / beforeApplicationShutdown / onApplicationShutdown.
  app.enableShutdownHooks();

  await app.listen(process.env.PORT ?? 3000, '0.0.0.0');
}
await bootstrap();
Source: NestJS documentation: Lifecycle events, "Application shutdown" and NestJS documentation: Rate limiting, "Proxies".
-
process.env.PORT ?? 3000lets the platform choose the port. Cloud Run, Heroku-style platforms and Elastic Beanstalk inject one. -
app.set('trust proxy', 1)tells Express to believe theX-Forwarded-*headers set by exactly one proxy hop. Without itreq.ipis the proxy’s address,req.protocolis alwayshttp(so secure cookies and generated links are wrong) and the throttler counts every client as one. Use the number of proxies you really have, or a subnet list;truetrusts anyone who can reach the port and lets a client forge its address. -
enableShutdownHooks()is what makesSIGTERMrun the shutdown hooks. Without it the process dies at once and in-flight work is lost; see Lifecycle Events & Shutdown. -
'0.0.0.0'matters on Fastify and is harmless on Express. Where each adapter listens:
express          listens on ::        (all interfaces)
fastify default  listens on ::1       (loopback only: unreachable from outside a container)
fastify, host '0.0.0.0'               (all IPv4 interfaces)
On Fastify the official performance page says the same: it listens on localhost unless you pass '0.0.0.0' to listen(). A container that listens on loopback passes docker run but refuses every connection published through its port mapping.
The Fastify equivalent of the proxy setting is an adapter option. The output below shows what each adapter reports for a request that carries X-Forwarded-For: 198.51.100.7, X-Forwarded-Proto: https and X-Forwarded-Host: api.example.com, the headers NGINX sets:
// Express
app.set('trust proxy', 1);

// Fastify
const app = await NestFactory.create<NestFastifyApplication>(
  AppModule,
  new FastifyAdapter({ trustProxy: true }),
);
await app.listen(process.env.PORT ?? 3000, '0.0.0.0');
trust proxy off {"ip":"127.0.0.1","protocol":"http","hostname":"127.0.0.1"}
trust proxy on {"ip":"198.51.100.7","protocol":"https","hostname":"api.example.com"}
fastify off {"ip":"127.0.0.1","protocol":"http"}
fastify on {"ip":"198.51.100.7","protocol":"https"}Source: NestJS documentation: Rate limiting, "Proxies", Express: Behind proxies and Fastify: trustProxy.
For Fastify, trustProxy: true trusts every hop. Prefer an address list or a hop count when the proxy’s address is known. On Fastify the hostname is not taken from X-Forwarded-Host in the same setup, so do not rely on it there.
Keep-alive timeouts behind a load balancer
Node.js closes an idle keep-alive connection after 5 seconds by default (keepAliveTimeout 5000 ms, headersTimeout 60000 ms on Node.js 24). A load balancer that holds its upstream connections open for 60 seconds will occasionally send a request on a connection Node has just closed and return a 502. The fix is to set the server’s timeout above the balancer’s idle timeout, and headersTimeout above keepAliveTimeout:
const server = app.getHttpServer();
server.keepAliveTimeout = 65_000; // above a 60 s load balancer idle timeout
server.headersTimeout = 66_000;   // must stay above keepAliveTimeout

// Fastify: the same limit as an adapter option
new FastifyAdapter({ keepAliveTimeout: 65_000 });
After either assignment the server reports a keepAliveTimeout of 65000. Whether and how often the 502 appears depends on the balancer. Keep-alive connections also delay shutdown; that trade-off, and forceCloseConnections, are in Lifecycle Events & Shutdown.
Liveness and readiness endpoints
Every orchestrator and most load balancers need two answers from the application. Liveness: is the process healthy enough to keep running, or should it be restarted? Readiness: may it receive traffic right now? They must not be the same check. A liveness probe that depends on the database restarts every replica when the database is down, which makes the outage worse; a readiness probe that depends on the database takes the replicas out of rotation instead, which is the right reaction.
import { Controller, Get } from '@nestjs/common';
import { HealthCheck, HealthCheckService } from '@nestjs/terminus';
import { DatabaseHealthIndicator } from './database.health.js';

@Controller('health')
export class HealthController {
  constructor(
    private readonly health: HealthCheckService,
    private readonly database: DatabaseHealthIndicator,
  ) {}

  /** Liveness: the process is up and the event loop answers. No dependencies. */
  @Get('live')
  @HealthCheck()
  live() {
    return this.health.check([]);
  }

  /** Readiness: may this instance receive traffic? Checks the dependencies. */
  @Get('ready')
  @HealthCheck()
  ready() {
    return this.health.check([() => this.database.isHealthy('database')]);
  }
}import { Injectable } from '@nestjs/common';
import { ConfigService } from '@nestjs/config';
import { HealthIndicatorService } from '@nestjs/terminus';
/** Marks the app "not ready" until the DB answers; here a stand-in for SELECT 1. */
@Injectable()
export class DatabaseHealthIndicator {
constructor(
private readonly indicators: HealthIndicatorService,
private readonly config: ConfigService,
) {}
isHealthy(key: string) {
return this.indicators
.check(key)
.attempt(async () => {
if (!this.config.get<string>('DATABASE_URL')) {
throw new Error('DATABASE_URL is not configured');
}
return { driver: 'postgres' };
})
.withTimeout(1000);
}
}import { Module } from '@nestjs/common';
import { TerminusModule } from '@nestjs/terminus';
import { DatabaseHealthIndicator } from './database.health.js';
import { HealthController } from './health.controller.js';
@Module({
imports: [
// Wait this long after SIGTERM, while /health/ready answers 503 "shutting_down",
// so that the load balancer stops sending new requests before the server closes.
TerminusModule.forRoot({ gracefulShutdownTimeoutMs: Number(process.env.GRACE_MS ?? 0) }),
],
controllers: [HealthController],
providers: [DatabaseHealthIndicator],
})
export class HealthModule {}Source: NestJS documentation: Health checks (Terminus), "Custom health indicator" and NestJS documentation: Health checks (Terminus), "Graceful shutdown timeout".
HealthIndicatorService is the Terminus 12 API: check(key).attempt(fn).withTimeout(ms) marks the indicator up when the function resolves and down when it throws; the legacy HealthIndicator base class was removed. In the real indicator the function would run a SELECT 1 through the TypeORM or Prisma health indicator; here it checks the configuration so that the example has no database dependency. The responses from the running process were:
GET /health/live   200 {"status":"ok","info":{},"error":{},"details":{}}
GET /health/ready  200 {"status":"ok","info":{"database":{"driver":"postgres","responseTime":0,"status":"up"}}, ...}
GET /health/ready  503 (DATABASE_URL missing)  error: {"database":{"message":"DATABASE_URL is not configured","status":"down"}}
The complete treatment, with the built-in indicators, degraded state and tracing, is on Health Checks & Observability.
Building and running
A Nest application is a TypeScript project, so production runs compiled JavaScript. The sequence is the one the official page gives.
npm ci                              # exact versions from package-lock.json
npm run build                       # nest build: compiles src/ to dist/
NODE_ENV=production node dist/main.jsOutput of the last command (with PORT and the database URL taken from the environment):
[Nest] LOG [NestFactory] Starting Nest application...
[Nest] LOG [RouterExplorer] Mapped {/books, GET} route
[Nest] LOG [RouterExplorer] Mapped {/health/live, GET} route
[Nest] LOG [RouterExplorer] Mapped {/health/ready, GET} route
[Nest] LOG [NestApplication] Nest application successfully started-
nest buildemptiesdist/first whendeleteOutDiristrue(the generatednest-cli.jsonsets it), so stale files from a previous build cannot linger. -
If a
.tsfile outsidesrc/is compiled as well (ascripts/seed.tsthat thetsconfig.jsonincludes, for example), TypeScript’s common root moves up and the entry becomesdist/src/main.js. PassrootDirin the buildtsconfigand keepsrcas the only included folder, as the generatedtsconfig.build.jsondoes, and the entry staysdist/main.js. -
In a Nest monorepo,
npm run build <app-name>builds one application, whose output isdist/apps/<app-name>/main.js. See Project Structure & Workspaces. -
nest startis a wrapper aroundnode dist/main.jsthat builds first. It is convenient on a laptop, but in production it needs the CLI, which is a dev dependency; runnodedirectly. -
NODE_ENV=productiondoes not change Nest’s own behaviour, but libraries read it: Express disables verbose error pages and caches templates, andnpm ciskips dev dependencies when it is set (see the pitfall in A multi-stage Dockerfile). Set it in the platform’s configuration, not in.envfiles that are committed. -
The build is also the place to speed up with SWC or Rspack; see Performance Optimization.
A multi-stage Dockerfile
The official page shows a single-stage Dockerfile (FROM node:24, npm install, npm run build, CMD ["node", "dist/main"]) and says to customise it, for example to install only production dependencies. The version below does that. It has two stages: a build stage that has everything needed to compile, and a production stage that receives only what is needed to run.
# syntax=docker/dockerfile:1

# ---- build stage: full dependency tree, compiles TypeScript ----
FROM node:24-slim AS build
WORKDIR /usr/src/app

# Copy only the manifests first so the npm ci layer is cached until they change.
COPY package.json package-lock.json ./
RUN npm ci

COPY nest-cli.json tsconfig.json tsconfig.build.json ./
COPY src ./src
RUN npm run build && npm prune --omit=dev

# ---- production stage: runtime files only ----
FROM node:24-slim AS production
ENV NODE_ENV=production
WORKDIR /usr/src/app

# Copied without --chown: the files stay owned by root and are only readable by "node".
COPY --from=build /usr/src/app/package.json ./
COPY --from=build /usr/src/app/node_modules ./node_modules
COPY --from=build /usr/src/app/dist ./dist

# The official node images ship an unprivileged "node" user (uid 1000).
USER node
EXPOSE 3000

HEALTHCHECK --interval=15s --timeout=3s --start-period=20s --retries=3 \
  CMD ["node", "-e", "fetch('http://127.0.0.1:3000/health/live').then(r=>process.exit(r.ok?0:1),()=>process.exit(1))"]

# Exec form: node is PID 1 and receives SIGTERM directly (no shell in between).
CMD ["node", "dist/main.js"]
Source: NestJS documentation: Deployment, "Dockerizing your application" and Docker: Multi-stage builds.
node_modules
dist
.git
*.log
.env*
test
Why each choice was made:
-
node:24-slim. The Debian-based slim image is small and has glibc, so native add-ons (bcrypt, sharp, database drivers) install from prebuilt binaries.node:24-alpineis smaller still but uses musl; use it only after your add-ons install on it. Pin a major line that is in active LTS, and consider pinning the digest for reproducible builds. Node.js 24 is active LTS on 2026-10-02, and a Nest 12 application needs 20.19+ or 22.12+. -
npm ci. It installs exactly whatpackage-lock.jsonrecords and fails when the lock andpackage.jsondisagree, so the image matches what CI tested.npm installmay rewrite the lock and move versions. -
Manifests first. Copying
package.jsonand the lock file before the sources lets Docker reuse thenpm cilayer until a dependency changes. Copying everything first re-installs on every code change. See Build Cache & Multi-stage Builds. -
npm run build && npm prune --omit=dev. The build needs@nestjs/cliand TypeScript, which are dev dependencies; the runtime does not. Pruning removes them fromnode_modulesbefore the copy. For the Bookshelf API,node_modulesshrinks from 89 MB before the prune to 40 MB after, withnest,tscandtypescriptgone and the five runtime@nestjs/*packages still present. -
NODE_ENV=productiononly in the production stage. If it were set in the build stage,npm ciwould skip the dev dependencies andnest buildwould fail with "command not found". -
Production stage copies, it does not install. Installing production dependencies before building (a pattern in the reference book’s Dockerfiles) leaves the build without the compiler; skipping the build step, the other pattern, ships TypeScript that nothing can run. Here the build happens once, in the first stage.
-
USER node, and no--chown. The official Node.js images ship an unprivilegednodeuser (uid 1000), andUSER nodemakes the application run as that user instead of root. A non-root process cannot bind ports below 1024 or change system files in the image. TheCOPYlines deliberately leave out--chown=node:node: the copiedpackage.json,node_modulesanddiststay owned by root with the default read permissions, so thenodeuser can read and execute them but a compromised process cannot rewrite its own code or dependencies. Adding--chown=node:nodewould hand those files to the very user the application runs as. The application listens on 3000, which needs no privilege, and writes nothing to its own directory; if it must write files (uploads, a cache), give it a dedicated directory owned bynodeor, better, a mounted volume. On Kubernetes,readOnlyRootFilesystem(Kubernetes: probes and graceful shutdown) enforces the same idea for the whole image. -
EXPOSE 3000only documents the port; publishing is done by-por the orchestrator. -
HEALTHCHECK. The slim image has nocurl, so the check runs Node’sfetch. Orchestrators that have their own probes (Kubernetes) ignore it; plain Docker, Compose and Swarm use it to mark the containerhealthyorunhealthy. Against a running application the command exits0. -
Exec-form
CMD ["node", "dist/main.js"]. Node is then the container’s first process and receivesSIGTERMdirectly. The shell form,CMD npm run start:prodor a wrapper script, puts a shell or npm in between, and a shell as PID 1 may not forward the signal; the container is then killed after the grace period instead of shutting down cleanly.
Build and run commands:
docker build -t bookshelf-api:1.0.0 .
docker run --rm -p 3000:3000 \
  -e DATABASE_URL="$DATABASE_URL" \
bookshelf-api:1.0.0What the commands in the two stages produce for the Bookshelf API, in a directory that holds only the files the COPY lines select:
npm ci                       ... 89M node_modules (devDependencies present: nest, tsc)
npm run build                ... dist/ written
npm prune --omit=dev         ... 40M node_modules (nest, tsc, typescript removed)
NODE_ENV=production node dist/main.js
  GET /books         200 [{"id":1,"title":"The Pragmatic Programmer"}]
  GET /health/live   200
  HEALTHCHECK command exits 0
  SIGTERM -> "Received termination signal SIGTERM", "Awaiting 5000ms before shutdown"; exit status 143
Images are pushed to a registry before a platform can pull them. The official page shows docker login, docker tag and docker push; the registry options are Docker Hub, Amazon ECR and Google Artifact Registry. Google Container Registry is deprecated in favour of Artifact Registry, so new setups use Artifact Registry. The site covers the mechanics in Registries & Docker Hub, Image Best Practices & Security and Dockerfile Fundamentals; for pushing from CI see CI/CD and CI/CD with GitHub Actions.
Docker Compose with PostgreSQL, Redis and RabbitMQ
Compose describes the whole stack in one file. This one reproduces the topology on a single host: an NGINX proxy, two replicas of the API, and the three backing services with named volumes and health checks. Note that there is no top-level version: key: Compose ignores it and prints a warning, and the current Compose Specification does not use it.
name: bookshelf

services:
  proxy:
    image: nginx:stable-alpine
    ports:
      - "80:80"
      - "443:443"
    volumes:
      - ./nginx/bookshelf.conf:/etc/nginx/conf.d/default.conf:ro
      - ./certs:/etc/nginx/certs:ro
    depends_on:
      api:
        condition: service_healthy
    restart: unless-stopped

  api:
    build:
      context: .
      target: production
    image: bookshelf-api:local
    # No "ports:" - only the proxy is reachable from outside. Scale with: docker compose up -d --scale api=4
    deploy:
      replicas: 2
    environment:
      NODE_ENV: production
      PORT: "3000"
      DATABASE_URL: postgres://bookshelf:${POSTGRES_PASSWORD:?set POSTGRES_PASSWORD}@postgres:5432/bookshelf
      REDIS_URL: redis://redis:6379
      RABBITMQ_URL: amqp://bookshelf:${RABBITMQ_PASSWORD:?set RABBITMQ_PASSWORD}@rabbitmq:5672
      GRACE_MS: "5000"
    depends_on:
      postgres:
        condition: service_healthy
      redis:
        condition: service_healthy
      rabbitmq:
        condition: service_healthy
    stop_grace_period: 20s
    restart: unless-stopped

  postgres:
    image: postgres:18
    environment:
      POSTGRES_USER: bookshelf
      POSTGRES_DB: bookshelf
      POSTGRES_PASSWORD: ${POSTGRES_PASSWORD:?set POSTGRES_PASSWORD}
    volumes:
      - pgdata:/var/lib/postgresql
    healthcheck:
      test: ["CMD-SHELL", "pg_isready -U bookshelf -d bookshelf"]
      interval: 5s
      timeout: 3s
      retries: 10
    restart: unless-stopped

  redis:
    image: redis:8
    command: ["redis-server", "--appendonly", "yes"]
    volumes:
      - redisdata:/data
    healthcheck:
      test: ["CMD", "redis-cli", "ping"]
      interval: 5s
      timeout: 3s
      retries: 10
    restart: unless-stopped

  rabbitmq:
    image: rabbitmq:4
    environment:
      RABBITMQ_DEFAULT_USER: bookshelf
      RABBITMQ_DEFAULT_PASS: ${RABBITMQ_PASSWORD:?set RABBITMQ_PASSWORD}
    volumes:
      - rabbitdata:/var/lib/rabbitmq
    healthcheck:
      test: ["CMD", "rabbitmq-diagnostics", "-q", "ping"]
      interval: 10s
      timeout: 5s
      retries: 10
    restart: unless-stopped

volumes:
  pgdata:
  redisdata:
  rabbitdata:
Source: Docker: Compose file reference.
Points that matter:
-
Secrets come from the environment. The required-variable form of interpolation makes
docker compose upstop with the given message whenPOSTGRES_PASSWORDorRABBITMQ_PASSWORDis not set, instead of starting a database with an empty password. Put the values in an untracked.envfile or the shell, never incompose.yaml. A password placed inside a URL must be percent-encoded if it contains characters such as@,/or:. -
depends_onwithcondition: service_healthywaits for the health checks, not just for the containers to start.pg_isready,redis-cli pingandrabbitmq-diagnostics -q pingare the checks the images support. Theapiservice has nohealthcheckof its own here because the image’sHEALTHCHECKis used, and theproxywaits for it. -
deploy.replicasstarts twoapicontainers, anddocker compose up -d --scale api=4changes the count. The service publishes no port, so only the proxy is reachable from outside and containers cannot clash on port 3000. -
stop_grace_period: 20smust be longer thanGRACE_MSplus the time to drain in-flight requests, because Compose sendsSIGTERMand thenSIGKILLafter that period. The default is 10 seconds. -
PostgreSQL 18 stores its data under a version-specific directory beneath
/var/lib/postgresql, which is why the volume is mounted one level higher than in older images. -
Database migrations must run once, not in every replica at start-up. Run them as a one-off command (
docker compose run --rm api node dist/migrate.js, with your own entry file) or as a separate service that theapiservice waits for withcondition: service_completed_successfully. See Data Overview & TypeORM. -
Redis persistence.
--appendonly yeskeeps queued jobs across a restart. A pure cache does not need it; BullMQ queues do.
Validate the file before starting it: docker compose config resolves the interpolations, merges the defaults and prints the normalised model, and needs no Docker daemon, so it also fits a CI step.
For the NGINX service the file nginx/bookshelf.conf is mounted:
# Compose's embedded DNS (127.0.0.11) returns one address per api replica.
# Using a variable in proxy_pass makes nginx re-resolve at run time instead of once at start-up.
resolver 127.0.0.11 valid=10s ipv6=off;

server {
    listen 80;
    server_name api.example.com;
    return 301 https://$host$request_uri;
}

server {
    listen 443 ssl;
    http2 on;
    server_name api.example.com;

    ssl_certificate     /etc/nginx/certs/fullchain.pem;
    ssl_certificate_key /etc/nginx/certs/privkey.pem;
    ssl_protocols       TLSv1.2 TLSv1.3;
    add_header Strict-Transport-Security "max-age=31536000; includeSubDomains" always;

    client_max_body_size 10m;

    location / {
        set $upstream http://api:3000;
        proxy_pass $upstream;

        proxy_http_version 1.1;
        proxy_set_header Host              $host;
        proxy_set_header X-Real-IP         $remote_addr;
        proxy_set_header X-Forwarded-For   $proxy_add_x_forwarded_for;
        proxy_set_header X-Forwarded-Proto $scheme;

        # WebSocket / Socket.IO upgrade (harmless for plain HTTP)
        proxy_set_header Upgrade    $http_upgrade;
        proxy_set_header Connection $connection_upgrade;

        proxy_read_timeout 60s;
    }
}

map $http_upgrade $connection_upgrade {
    default upgrade;
    ''      close;
}The resolver line and the variable in proxy_pass make NGINX look up api again every 10 seconds, so it follows the replicas as they come and go. With a literal proxy_pass http://api:3000; NGINX resolves the name once at start-up and keeps the addresses it found. This file was not parsed by NGINX (not installed here); test it with nginx -t before relying on it. For the Compose features themselves see Compose Fundamentals and Compose in Practice, and for container networking Networking.
PM2 on a plain server
Without containers, something has to start the process, restart it when it crashes and start it again after a reboot. On a server that is a process manager: PM2 or systemd. PM2 is a Node.js-specific manager that adds cluster mode and zero-downtime reloads.
module.exports = {
  apps: [
    {
      name: 'bookshelf-api',
      script: 'dist/main.js',
      cwd: __dirname,
      // One process per CPU core; use "fork" mode (instances: 1) when an orchestrator scales for you.
      exec_mode: 'cluster',
      instances: 'max',
      max_memory_restart: '300M',
      kill_timeout: 10000, // ms between SIGINT and SIGKILL; keep it above your graceful-shutdown time
      env: { NODE_ENV: 'production' }, // PORT, DATABASE_URL, ... come from the environment
    },
  ],
};
Source: PM2: Ecosystem file and PM2: Cluster mode.
The file is .cjs because the project is "type": "module" and PM2 loads the configuration with require. The commands:
pm2 start ecosystem.config.cjs     # start the app
pm2 reload bookshelf-api           # zero-downtime restart, one instance at a time
pm2 logs bookshelf-api
pm2 startup && pm2 save            # restart the process list after a reboot
The ESM build runs under PM2 7.0.4 in cluster mode, with the instances sharing one port. With two instances, pm2 reload while a client sends a request every 100 milliseconds answers 200 to all 60 requests. pm2 startup and pm2 save write to the system’s init configuration, so run them once, deliberately, on the server.
-
Cluster mode versus one process per container. PM2’s cluster mode forks one worker per CPU core and balances them through Node’s
clustermodule. It is the right tool on a single VM. Inside a container, run one process and scale with the platform (replicas, an HPA, a service count), because the orchestrator then sees real CPU and memory per replica and can restart or reschedule it. If you do run PM2 in a container, usepm2-runtime, which keeps the container’s first process in the foreground. -
Memory.
max_memory_restartrestarts a worker that grows past the limit, which hides a leak rather than fixing it. The command-line flag is--max-memory-restart(two dashes; the reference book prints it with one). -
kill_timeout. PM2 sendsSIGINT, waits this long and then sendsSIGKILL. Nest’s shutdown hooks react toSIGINTas well asSIGTERMonceenableShutdownHooks()is on, so keep the timeout above the time the application needs to drain. -
Each cluster worker is a full application. Anything held in process memory (a cache, a rate-limit counter, a WebSocket room, a cron job) exists once per worker. See Scaling out: what must not live in the process.
NGINX with TLS in front of PM2
On a server the proxy is NGINX on the same host, with a certificate from Let’s Encrypt. The application listens on the loopback address only and NGINX is the sole public listener.
upstream bookshelf_api {
    server 127.0.0.1:3000;
    keepalive 32;
}

server {
    listen 80;
    server_name api.example.com;
    return 301 https://$host$request_uri;
}

server {
    listen 443 ssl;
    http2 on;
    server_name api.example.com;

    ssl_certificate     /etc/letsencrypt/live/api.example.com/fullchain.pem;
    ssl_certificate_key /etc/letsencrypt/live/api.example.com/privkey.pem;
    ssl_protocols       TLSv1.2 TLSv1.3;
    add_header Strict-Transport-Security "max-age=31536000; includeSubDomains" always;

    location / {
        proxy_pass http://bookshelf_api;
        proxy_http_version 1.1;
        proxy_set_header Connection "";          # lets NGINX reuse upstream connections
        proxy_set_header Host              $host;
        proxy_set_header X-Real-IP         $remote_addr;
        proxy_set_header X-Forwarded-For   $proxy_add_x_forwarded_for;
        proxy_set_header X-Forwarded-Proto $scheme;
    }
}
sudo nginx -t # check the configuration
sudo certbot --nginx -d api.example.com # obtain and install the certificate, set up renewalSource: NGINX: Configuring HTTPS servers and Certbot.
Treat the file as a starting point and check it with nginx -t before reloading NGINX. What the application does with the headers is shown in Preparing the application: with trust proxy enabled, req.ip, req.protocol and the host come from X-Forwarded-For, X-Forwarded-Proto and X-Forwarded-Host.
-
WebSockets and Socket.IO need the
UpgradeandConnectionheaders; use themapblock from the Compose file and drop theConnection ""line. With more than one instance, also use sticky sessions or the Redis adapter; see WebSockets. -
Server-Sent Events are buffered by NGINX unless you disable
proxy_bufferingfor that location or the application sends theX-Accel-Buffering: noheader; see Server-Sent Events. -
Compression and static files. Decide whether NGINX or Nest compresses, not both; see MVC, Static Files & Compression.
-
Security headers, CORS and rate limiting. The proxy can add HSTS (above); Helmet and CORS are application concerns, and the throttler needs
trust proxy. See Security Headers, CORS & CSRF and Rate Limiting & Encryption. -
Request size.
client_max_body_sizedefaults to 1 MB; raise it to match the file-upload limits in File Upload & Streaming. -
Terminating TLS in Nest itself is possible (
httpsOptionsinNestFactory.create), but a proxy handles certificate renewal, HTTP to HTTPS redirects, HTTP/2 and static caching better. See the official FAQ on HTTPS and multiple servers.
Kubernetes: probes and graceful shutdown
On Kubernetes the platform provides the proxy (an Ingress or Gateway), the replication (a Deployment) and the restarts. The application provides probes and a clean shutdown. This manifest wires the endpoints from Liveness and readiness endpoints to the three probe types.
apiVersion: apps/v1
kind: Deployment
metadata:
  name: bookshelf-api
  labels:
    app.kubernetes.io/name: bookshelf-api
spec:
  replicas: 3
  selector:
    matchLabels:
      app.kubernetes.io/name: bookshelf-api
  strategy:
    type: RollingUpdate
    rollingUpdate:
      maxSurge: 1
      maxUnavailable: 0
  template:
    metadata:
      labels:
        app.kubernetes.io/name: bookshelf-api
    spec:
      terminationGracePeriodSeconds: 30
      securityContext:
        runAsNonRoot: true
        runAsUser: 1000   # the "node" user of the official image; Kubernetes cannot verify a named USER
      containers:
        - name: api
          image: registry.example.com/bookshelf/api:1.0.0
          ports:
            - name: http
              containerPort: 3000
          env:
            - name: NODE_ENV
              value: production
            - name: PORT
              value: "3000"
            - name: GRACE_MS
              value: "5000"
            - name: DATABASE_URL
              valueFrom:
                secretKeyRef:
                  name: bookshelf-api
                  key: database-url
          resources:
            requests:
              cpu: 250m
              memory: 256Mi
            limits:
              memory: 512Mi
          startupProbe:
            httpGet: { path: /health/live, port: http }
            periodSeconds: 2
            failureThreshold: 30
          livenessProbe:
            httpGet: { path: /health/live, port: http }
            periodSeconds: 10
            timeoutSeconds: 2
            failureThreshold: 3
          readinessProbe:
            httpGet: { path: /health/ready, port: http }
            periodSeconds: 3
            timeoutSeconds: 2
            failureThreshold: 2
          securityContext:
            allowPrivilegeEscalation: false
            readOnlyRootFilesystem: true
            capabilities:
              drop: ["ALL"]
---
apiVersion: v1
kind: Service
metadata:
  name: bookshelf-api
spec:
  selector:
    app.kubernetes.io/name: bookshelf-api
  ports:
    - name: http
      port: 80
      targetPort: http
---
apiVersion: autoscaling/v2
kind: HorizontalPodAutoscaler
metadata:
  name: bookshelf-api
spec:
  scaleTargetRef:
    apiVersion: apps/v1
    kind: Deployment
    name: bookshelf-api
  minReplicas: 3
  maxReplicas: 10
  metrics:
    - type: Resource
      resource:
        name: cpu
        target:
          type: Utilization
          averageUtilization: 70
---
apiVersion: policy/v1
kind: PodDisruptionBudget
metadata:
  name: bookshelf-api
spec:
  minAvailable: 2
  selector:
    matchLabels:
      app.kubernetes.io/name: bookshelf-api
Source: NestJS documentation: Health checks (Terminus) and Kubernetes: Configure Liveness, Readiness and Startup Probes.
The file parses as four YAML documents (Deployment, Service, HorizontalPodAutoscaler, PodDisruptionBudget). It was not applied: kubectl was available as a client but there was no cluster, and kubectl apply --dry-run=client still needs one for API discovery. Schema errors are therefore possible; run kubectl apply --dry-run=server on a real cluster first.
-
Startup probe. It runs first and holds back the other two until the application answers, so a slow start (module graph, migrations check, connection pools) is not killed by the liveness probe. Thirty failures at two-second intervals allow a minute.
-
Liveness probe on
/health/live. It has no dependency checks, so a database outage cannot cause restarts. KeepfailureThresholdgenerous. -
Readiness probe on
/health/ready. A503removes the pod from the Service endpoints; the pod keeps running and is added back when the check passes again. -
runAsUser: 1000. The Dockerfile’sUSER nodeis a name, and Kubernetes cannot prove a named user is not root, sorunAsNonRoot: trueneeds the numeric id. -
readOnlyRootFilesystem: true. The compiled application writes nothing. If a library needs a temp directory, mount anemptyDirat/tmp. -
maxUnavailable: 0withmaxSurge: 1replaces pods one at a time and only after the new pod is ready, so the readiness probe gates the rollout. -
Secrets come from
secretKeyRef; see Secrets. The image reference is a placeholder.
What happens when a pod is stopped
A rolling update, a scale-down and a node drain all end the same way: the kubelet sends SIGTERM to the container’s first process, waits up to terminationGracePeriodSeconds, and then sends SIGKILL. At the same time the pod is removed from the Service endpoints, but that change takes a moment to reach every kube-proxy, ingress controller and cloud load balancer, so for a short time requests may still arrive. Nest and Terminus fill that gap.
Source: NestJS documentation: Health checks (Terminus), "Graceful shutdown timeout" and Kubernetes: Pod lifecycle.
With the compiled application started with GRACE_MS=3000, a SIGTERM sent to the process produces:
Received termination signal SIGTERM
Awaiting 3000ms before shutdown
Timeout reached, shutting down now
GET /health/ready during the delay -> 503 {"status":"shutting_down", ...}
process exit status: 143
Plan the numbers so that they nest: the readiness periodSeconds times failureThreshold is how long a balancer that uses the endpoint takes to notice (6 seconds above); GRACE_MS should be at least that and cover endpoint propagation (5 seconds in the manifest); the time to drain the slowest in-flight request comes on top; and terminationGracePeriodSeconds (30 above) must exceed the whole sum. Terminus applies the delay only for SIGTERM, not for SIGINT, so pressing Ctrl+C locally still stops at once. Whether the delay is applied on Kubernetes, and how it interacts with the endpoint removal and a real load balancer, was not observed: no cluster was available. Use a preStop hook only if you want the delay outside the application.
For the Kubernetes mechanics see Health Probes & Lifecycle, ReplicaSets & Deployments, Deployment Strategies, Autoscaling, Scheduling & Disruptions (the PodDisruptionBudget), Resource Management, Pod Security and Ingress. The shutdown hooks themselves are on Lifecycle Events & Shutdown.
Scaling out: what must not live in the process
Horizontal scaling only works when any replica can serve any request. The official page recommends containers and load balancers; the code-level consequence is that per-process state has to go. This table lists the usual suspects in a Nest application.
| State | What goes wrong with several replicas | Fix |
|---|---|---|
In-memory cache ( |
Each replica has its own copy; invalidation reaches one. |
A shared store (Redis); see Caching. |
Throttler counters |
The limit is multiplied by the number of replicas. |
Redis-backed storage, plus |
Sessions and cookies |
A login lasts only on the replica that created it. |
Stateless JWT, or a shared session store; see Cookies & Sessions. |
|
Every replica runs every job: the digest is sent three times. |
A distributed lock or a single scheduler instance; see Events, Scheduling & Queues and Resilience, Idempotency & Locks. |
WebSocket rooms |
Clients on different replicas do not see each other’s events. |
The Redis adapter, and sticky sessions for the transport upgrade; see WebSockets. |
Database connection pools |
Pool size times replicas can exceed the database’s connection limit. |
Size pools per replica and watch the total; add a pooler if needed. |
Local files (uploads) |
A file written by one replica is missing on the others. |
Object storage; see i18n, Mail & File Storage. |
Startup migrations |
N replicas race to migrate the same schema. |
A one-off job or an init step; see Docker Compose with PostgreSQL, Redis and RabbitMQ. |
Serverless: AWS Lambda
A serverless platform runs your code per request or event and bills for the time used; the provider owns the servers. The cost for a Nest application is the cold start: the first invocation on a new execution environment must load the code and bootstrap the application. The official FAQ says Nest is "suitable for much simpler applications (or scripts)" through standalone applications, and it integrates the full HTTP application with the Serverless framework as the worked example.
An HTTP application behind API Gateway
Install the adapter and the types, and (for local testing in the Serverless framework) the offline plugin:
npm i @codegenie/serverless-express
npm i -D @types/aws-lambda serverless-offlineimport { NestFactory } from '@nestjs/core';
import { configure as serverlessExpress } from '@codegenie/serverless-express';
import type { Callback, Context, Handler } from 'aws-lambda';
import { AppModule } from './app.module.js';
let server: Handler;
async function bootstrap(): Promise<Handler> {
const app = await NestFactory.create(AppModule);
await app.init();
const expressApp = app.getHttpAdapter().getInstance();
return serverlessExpress({ app: expressApp });
}
export const handler: Handler = async (
event: any,
context: Context,
callback: Callback,
) => {
server = server ?? (await bootstrap());
return server(event, context, callback);
};service: bookshelf-api
plugins:
- serverless-offline
provider:
name: aws
runtime: nodejs24.x
memorySize: 1024
timeout: 15
environment:
NODE_ENV: production
# Only for a CommonJS build on the Lambda Node.js runtimes (append to existing NODE_OPTIONS):
# NODE_OPTIONS: --experimental-require-module
functions:
main:
handler: dist/lambda.handler
events:
- http:
method: ANY
path: /
- http:
method: ANY
path: '{proxy+}'The handler caches the wrapped application in a module-level variable, so only the first invocation of an execution environment pays for NestFactory.create() and app.init(); later invocations reuse it. app.init() runs the module initialisation without opening a port, and serverlessExpress({ app }) translates API Gateway events into requests on the Express instance.
Two differences from the official sample are deliberate. The sample uses a default import, import serverlessExpress from '@codegenie/serverless-express', which works in a CommonJS project. In an ESM project with module: nodenext TypeScript types that default import as the module namespace and reports This expression is not callable; the named export configure is the same function (the package assigns module.exports.configure) and type-checks and runs in both. The sample’s runtime: nodejs22.x is replaced by nodejs24.x; use a runtime that your region offers and that satisfies the Node.js floor.
Invoked in Node.js with test events for both API Gateway payload formats, the handler answers as follows. The serverless.yml above uses http events, which are payload format 1.0 (REST API); format 2.0 is what an HTTP API sends:
v2.0 GET /books        -> 200 [{"id":1,"title":"The Pragmatic Programmer"}]
v2.0 GET /health/live  -> 200 {"status":"ok","info":{},"error":{},"details":{}}
v2.0 GET /nope         -> 404 {"message":"Cannot GET /nope","error":"Not Found","statusCode":404}
v1.0 GET /books (REST API event, resource /{proxy+}) -> 200 [{"id":1, ...}]
CommonJS and NODE_OPTIONS=--experimental-require-module
All first-party Nest 12 packages are ESM-only. A CommonJS application loads them through require(esm), which is unflagged from Node.js 20.19 and 22.12. The migration guide says AWS Lambda disables require(esm) on its Node.js 20, 22 and 24 runtimes, so a CommonJS Nest 12 function fails to start there unless the function’s environment sets:
NODE_OPTIONS=--experimental-require-moduleIf NODE_OPTIONS already has other flags, append this one. An ESM project (the Nest 12 default) does not need it. Disabling require(esm) locally the way the runtime does reproduces the failure and the fix:
NODE_OPTIONS="--no-experimental-require-module"  node lambda-cjs-run.cjs
  Error [ERR_REQUIRE_ESM]: require() of ES Module .../node_modules/@nestjs/core/index.js ... not supported.

NODE_OPTIONS="--no-experimental-require-module --experimental-require-module"  node lambda-cjs-run.cjs
  200 [{"id":1,"title":"The Pragmatic Programmer"}]
Source: NestJS documentation: Migration guide and AWS Lambda: Building Lambda functions with Node.js.
That reproduces the Node.js behaviour, not the Lambda service itself, so confirm the setting on a deployed function. In a CommonJS project the entry file also calls bootstrap() without top-level await, because CommonJS has none.
Cold starts
The FAQ measures how much of the cold start is Nest. On the machine it names (a 2014 laptop), the startup of a bare Express script was about 8 ms, the same app on Nest with @nestjs/platform-express about 197 ms, a standalone Nest application about 112 ms, and a plain Node.js script about 7 ms; bundling with webpack brought the Nest HTTP application to about 82 ms and the standalone one to about 32 ms. Those absolute numbers belong to that machine, but the ratios hold: the framework adds tens to hundreds of milliseconds, and bundling reduces it.
The same measurement on a current developer machine, for the Bookshelf API (three controllers' worth of modules, Terminus, ConfigModule), unbundled, in fresh Node.js processes (range of three runs):
import of dist/lambda.js   246 - 399 ms
first invocation           94 - 140 ms   (NestFactory.create + app.init + the request)
warm invocation            0.4 ms
The numbers include only Node.js and application code; they leave out Lambda’s own environment start, the download of the package and any network connections made during bootstrap, which are usually larger. Ways to shorten a cold start, in the order they usually pay off:
-
Do less in module initialisation. A database connection defined as an asynchronous provider delays the first response by the time it takes to connect. Defer connections that not every invocation needs: do not make a Redis cache an async provider if only some requests use it.
-
Lazy-load modules that only some invocations need, with
LazyModuleLoader(see ModuleRef, Circular Dependencies & Lazy Loading). -
Use a standalone application when the function does not need routing, guards, interceptors or pipes (next section).
-
Bundle and minify. The CLI can build with Rspack or webpack; for a bundle, the entry must still export
handler. The FAQ describes the webpack settings (libraryTarget: 'commonjs2', andkeep_classnamesfor Terser soclass-validatorkeeps working). Bundling was not tested here, so treat that as the documented route. -
Give the function enough memory. Lambda allocates CPU in proportion to memory, so a larger setting often shortens bootstrap.
-
Keep environments warm with the provider’s provisioned-capacity feature when the latency matters more than the cost.
Source: NestJS documentation: Serverless, "Cold start" and NestJS documentation: Lazy-loading modules.
Swagger UI behind API Gateway needs one extra step, from the same page: the request’s originalUrl can lack the trailing slash the UI expects and cause an endless redirect, so a small middleware that rewrites /swagger to /swagger/ must be registered before SwaggerModule.setup(). See OpenAPI & Swagger.
Standalone applications as functions
When a function only needs Nest’s dependency injection, create an application context and skip the HTTP server and Express altogether. Guards, interceptors and pipes do not wrap controller methods in this mode, because there are no controller routes; use NestFactory.create() if you need them.
import { Injectable, Module } from '@nestjs/common';
import { NestFactory } from '@nestjs/core';

@Injectable()
export class DigestService {
  build(event: { bookIds: number[] }) {
    return { count: event.bookIds.length };
  }
}

@Module({ providers: [DigestService] })
export class DigestModule {}

let ctx: Awaited<ReturnType<typeof NestFactory.createApplicationContext>> | undefined;

// A function that needs Nest's DI but no HTTP server: it boots faster and has no Express.
export const handler = async (event: { bookIds: number[] }) => {
  ctx ??= await NestFactory.createApplicationContext(DigestModule, { logger: false });
  return ctx.get(DigestService).build(event);
};
Source: NestJS documentation: Serverless, "Using standalone application feature" and NestJS documentation: Standalone applications.
The context is created once per execution environment and reused. Called as a function, handler({ bookIds: [1, 2, 3] }) returns { count: 3 }. Standalone applications, cron jobs, CLIs and workers are the subject of Platform Agnosticism & Standalone Apps. For the AWS side (events, deployment, concurrency) see Lambda and Lambda: Event-Driven & Serverless Apps, and the comparison in Choosing a Compute Service.
Mau and nest deploy
Mau is the official NestJS deployment platform. It deploys to AWS from the command line and provisions the pieces this page assembled by hand: the server, databases (PostgreSQL, MySQL, MongoDB-compatible DocumentDB, Redis), brokers (RabbitMQ, Kafka, NATS), scheduled tasks, Lambda functions, environment variables, scaling, monitoring and CI/CD. From Nest 12 the CLI has a deploy command, a thin wrapper over the Mau CLI:
nest deploy                  # forwards every argument to "mau deploy"

npm install -g @nestjs/mau   # in CI, where prompts are not available
mau deploy
Source: NestJS documentation: Deployment, "Easy deployment with Mau" and NestJS documentation: CLI usage, "nest deploy".
If @nestjs/mau is not installed, nest deploy offers to add it as a dev dependency; in a non-interactive environment it fails instead of prompting, so install it explicitly first. Generated Nest 12 projects already list @nestjs/mau as a dev dependency. Both @nestjs/mau (0.2.8) and the platform are young: pin the version and read its release notes.
mau deploy --help in the installed 0.2.8 lists the options that connect Mau to the Dockerfile on this page:
--dockerfile [path]    Path to the custom Dockerfile
--image [image]        Base docker image to use for the deployment (default: "node:24.18.0-bookworm-slim")
--entry-file [file]    Entry file, defaults to "dist/main.js" or "dist/apps/<name>/main.js"
--target <target>      Sets the Docker target build stage to use when building the image
--build-arg <arg>      Build-time variables, key=value
--on-conflict <action> abort or bump (default: bump)
--wait-for-service-stability   Wait until the service is stable (applications only)
--no-cache             Do not use cache when building the image
So a multi-stage Dockerfile with a named production target can be used with mau deploy --dockerfile Dockerfile --target production. The options above come from the CLI help output; a deployment needs a Mau account and AWS resources. Mau’s pages are at mau.nestjs.com.
The official page maps each topic of the deployment chapter to Mau: environment variables and secrets are set in the dashboard; logs are collected there (JSON logging helps); scaling is built in; health checks point at the Terminus endpoint; metrics come from CloudWatch and managed databases are backed up automatically. The trade-off the page itself states for any managed platform applies: less to run, more cost and less control than a server you manage.
Cloud targets
The cloud container services all take the image from A multi-stage Dockerfile. What differs is who provides the proxy, the replication and the secrets. The NestJS-specific requirements are the same everywhere: listen on the port the platform gives (PORT) on all interfaces, answer a readiness endpoint, handle SIGTERM within the platform’s grace period, and read configuration from the environment.
| Cloud | Services for a Nest container | Pages on this site |
|---|---|---|
AWS |
Elastic Beanstalk (a Docker platform that builds and runs a Dockerfile behind a load balancer), ECS on Fargate (container tasks behind an Application Load Balancer), EKS, Lambda; images in Amazon ECR |
Choosing a compute service, ECS and Fargate, Container registry, EKS clusters, Lambda, Route 53 and certificates, Secrets Manager and KMS, RDS |
Google Cloud |
Cloud Run (a container that scales to zero and receives its port in |
Cloud Run, Container registry and builds, GKE clusters, Cloud SQL, Secret Manager and KMS |
Azure |
App Service (a custom container on a managed host), Container Apps, AKS; images in Azure Container Registry |
App Service and Functions, Container Apps, AKS clusters, Container registry, PostgreSQL and MySQL |
-
Port and address. Platforms that inject
PORT(Cloud Run, Elastic Beanstalk) work withprocess.env.PORT ?? 3000; with Fastify keep'0.0.0.0'. -
Termination. The platform sends
SIGTERMand thenSIGKILLafter a grace period that is configurable on some services and fixed on others (Cloud Run’s default is short, on the order of ten seconds; check the current value for your service). KeepGRACE_MSand the drain time inside it. -
Health checks. Point the platform’s health check at
/health/ready, or at/health/livewhere only one check is available and a database outage should not recycle instances. -
Logging. Write JSON lines to standard output; each platform collects them. See Logging.
-
Databases and brokers. Prefer the managed services: RDS, AWS messaging, Memorystore, Azure Redis; they come with backups and failover, which Backups and disaster recovery returns to.
-
Provider commands. The platform steps differ per provider and change often, so follow the provider guides above and the vendor documentation: Elastic Beanstalk Docker platform, Cloud Run deploying, Artifact Registry, App Service custom container and Container Apps.
Backups and disaster recovery
The application is stateless and its image is reproducible, so recovering a deployment means recovering three things: the data, the configuration and the ability to run the image somewhere else. Decide two numbers first: the recovery point objective (how much data you can lose) and the recovery time objective (how long you can be down). Backups you have never restored are a hope, not a plan.
| Component | What to back up | How |
|---|---|---|
PostgreSQL |
The data, plus the write-ahead log for point-in-time recovery. |
Logical dumps with |
Redis |
Only what is not rebuildable: queued jobs and anything used as a primary store. A pure cache needs nothing. |
RDB snapshots and the append-only file ( |
RabbitMQ |
Definitions (users, queues, exchanges, bindings) and messages in durable queues. |
Export definitions regularly; keep durable queues on persistent volumes or use replicated queue types; plan for messages that were in flight. |
Configuration and secrets |
Environment values, certificates, the Kubernetes manifests, the Compose file. |
Keep manifests in Git; keep secrets in a secret manager with versioning, not in the repository. |
Images |
The exact image that ran in production. |
Tag releases immutably (version or digest), keep them in a registry that is itself replicated, and keep the Dockerfile and lock file in Git so the image can be rebuilt. |
# Logical dump of one database (custom format, restorable with pg_restore).
pg_dump --format=custom --file=bookshelf.dump "$DATABASE_URL"

# Restore into a new, empty database
pg_restore --dbname="$RESTORE_DATABASE_URL" --no-owner bookshelf.dump
Source: PostgreSQL: Backup and Restore.
The commands are standard PostgreSQL tooling; rehearse them against a copy before you need them. A recovery drill has four steps worth scripting: create a fresh environment from the manifests and image tag, restore the latest backup into a new database, run the application against it and check /health/ready, and measure how long it took against the recovery time objective. For the data stores see the Redis persistence documentation, the RabbitMQ backup documentation, Redis persistence and primary database page on this site, AWS managed databases and Google Cloud managed databases. The messaging side is on RabbitMQ operations, monitoring and security.
After a restore, remember the application-level traps: a restored queue can redeliver messages, so consumers must be idempotent, and a restored database can be older than the cache and the search index. See Resilience, Idempotency & Locks and Outbox & Durable Workflows.
Production checklist
| Area | Check |
|---|---|
Build |
|
Image |
Multi-stage; dev dependencies pruned; |
Process |
|
Health |
|
Scale |
No per-process state (cache, throttler, sessions, cron, rooms); migrations run once; pool sizes times replicas below the database limit. |
Network |
TLS terminates at the proxy; HSTS; keep-alive timeouts above the balancer’s idle timeout; only the proxy is public. |
Secrets and config |
Everything from environment or a secret manager through |
Observability |
JSON logs on standard output; metrics and traces; alerts on readiness failures and restarts. See Health Checks & Observability and Logging. |
Recovery |
Backups with a tested restore; the manifests and image tags in version control; a documented rollback. |
Common pitfalls
-
Setting
NODE_ENV=productionbeforenpm ci. The dev dependencies are skipped andnest buildis not found. Set it in the final stage only. -
Running
nest startin production. It needs the CLI and builds on every start; runnode dist/main.js. -
A shell or npm as the container’s first process. The shutdown signal may not reach Node.js. Use the exec form.
-
Listening on loopback in a container (Fastify without
'0.0.0.0'). The health check passes inside the container and every external connection is refused. -
`trust proxy` left off, or set to
true. Off: the client address and scheme are wrong behind the proxy. On for everyone: clients can forge their address. -
A liveness probe that checks the database. A database outage restarts every pod.
-
`terminationGracePeriodSeconds` shorter than
GRACE_MSplus the drain time. Requests are cut bySIGKILL. -
Cron jobs and in-memory caches in several replicas. Duplicate work and stale data.
-
Everything in PM2 cluster mode inside every container. Two layers of scaling fight each other; one process per container.
-
Baking secrets into the image or committing
.env. Anyone who can pull the image reads them. -
Untested backups. The first restore happens during the incident.
-
Applying the Compose or Kubernetes files from this page unchanged. They are validated for syntax, not for your environment.
What changed recently
-
Docs restructure and Node.js floor. The official Deployment page now lists Node.js 20.19+ (or 22.12+) as a prerequisite, uses Node.js 24 in its Dockerfile, and has an "Easy deployment with Mau" section.
-
nest deployis new in the Nest 12 CLI; it wraps the Mau CLI and installs@nestjs/mauon demand. -
ESM-only packages (Nest 12) affect deployment: ESM projects need nothing special; CommonJS projects on AWS Lambda need
NODE_OPTIONS=--experimental-require-module, because Lambda disablesrequire(esm). Generated projects choose ESM or CommonJS at creation. -
Terminus 12 removed the legacy
HealthIndicatorandHealthCheckError; custom indicators useHealthIndicatorService. ThegracefulShutdownTimeoutMsoption is unchanged. -
The Express adapter drains in-flight requests on shutdown in Nest 12, which makes rolling updates safer.
-
Google Container Registry is deprecated in favour of Artifact Registry, and the Compose
version:key is obsolete. -
The Nest 12 serverless sample uses the ESM
.jsimport extensions and the@codegenie/serverless-expresspackage (the successor of the earlier@vendia/serverless-express).
Where the book is outdated
The reference book (see the section bibliography) devotes a chapter to deployment: a local production-like setup with an NGINX reverse proxy and TLS, PM2, a Dockerfile with multi-stage builds, AWS Elastic Beanstalk, Google Cloud Run and Azure App Service, monitoring, backups and scaling. The concepts hold. The details need care:
-
Its Dockerfiles either skip the build step or install production dependencies before building, so they cannot produce a working image. Use the two-stage pattern on this page.
-
It was written for NestJS 10, before the ESM-only packages: it says nothing about
require(esm)on Lambda or aboutnest deployand Mau. -
Its PM2 flag is printed as
-max-memory-restart; the flag is--max-memory-restart. -
It refers to Google Container Registry, now replaced by Artifact Registry.
-
Compose files from that period start with a
version:key, which current Compose ignores. -
Its serverless and Docker Node.js versions predate Node.js 24 and the 20.19 / 22.12 floor.